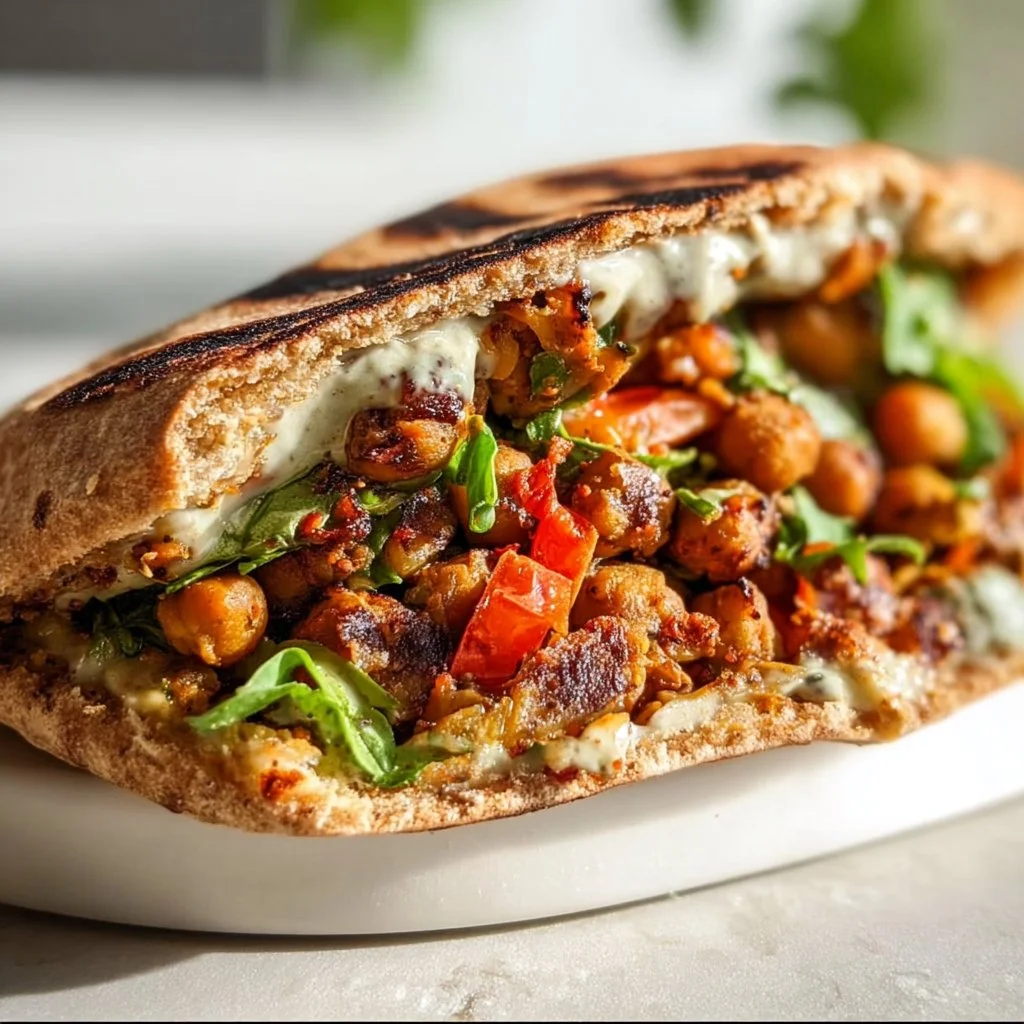
Grilled Chickpea Veggie Pita is a delicious option for anyone seeking a simple, nutritious, and satisfying meal. Packed with protein and flavor, this recipe offers a delightful way to enjoy fresh vegetables and chickpeas. It’s perfect for a quick weeknight dinner or a fun addition to weekend gatherings, and it will surely impress your family and friends!

Why You’ll Love Grilled Chickpea Veggie Pita:
- Nutritious and Wholesome: With chickpeas, veggies, and whole grain pitas, this meal is rich in fiber and essential nutrients.
- Easy to Prepare: The recipe involves simple steps and ingredients that most people already have at home.
- Customizable: You can modify the filling or toppings based on your taste preferences and what’s in season.
- Vegan-Friendly: This recipe is completely plant-based and suitable for anyone avoiding animal products.
- Great for Meal Prep: The ingredients can be prepared in advance, making it a quick meal option for busy days.
Prep & Cook Time Breakdown
- Prep Time: 15 minutes
- Cook Time: 20 minutes
- Total Time: 35 minutes
What You Need For Grilled Chickpea Veggie Pita
- 2 tbsp avocado oil, divided
- 1, 15 oz can chickpeas, rinsed and drained
- 1/2 yellow onion, finely diced
- 1 red bell pepper, finely diced
- 4 oz of mushrooms, finely diced
- 5 cloves garlic, minced or crushed
- 1 tbsp tomato paste
- 1/2 tbsp soy sauce or coconut aminos
- 2 tsp za’atar
- 1/2 tsp ground cumin
- 1/2 tsp ground coriander
- 1/4 tsp fennel seeds
- 1/4 cup parsley, minced
- Salt and pepper to taste
- 3 whole grain pitas
- 1/2 cup plain, unsweetened vegan Greek-style yogurt or your favorite thick vegan yogurt
- Juice of half a lemon
- Salt and pepper to taste
- 1 clove garlic, crushed or finely grated
- 1/4 cup cilantro, finely minced
- 2 tsp extra virgin olive oil, optional
Step-by-Step: How to Make Grilled Chickpea Veggie Pita
Directions Made Simple
-
Mash the Chickpeas: Place your chickpeas in a bowl and roughly mash them with a fork to crumble them, then set aside.
-
Sauté the Vegetables: In a sauté pan over medium heat, heat up a tablespoon of oil. Add the onion, bell pepper, and mushrooms. Give the mixture a quick toss and let it sit for 2-3 minutes to release some of the moisture. Sprinkle in a pinch of salt and continue to sauté until the mixture has cooked down and most of the liquid has evaporated.
-
Add Flavor: Add the garlic and sauté until fragrant. Then add the tomato paste, mashed chickpeas, soy sauce, za’atar, cumin, coriander, and fennel seeds. Sauté for an additional 2-3 minutes.
-
Finish the Filling: Stir in the parsley, taste and adjust the seasoning to your liking, then set aside.
-
Prepare the Pitas: Preheat a griddle. Cut your pitas in half and open the pockets. Carefully stuff each pita half until it is filled to the top. Brush or spray the pitas with the remaining oil.
-
Grill the Pitas: Place the pita filling side down on the grill for 3-4 minutes until grill marks appear. Flip and sear for about 3 minutes on the other sides. Repeat with the remaining pitas.
-
Make the Yogurt Sauce: In a bowl, combine the yogurt sauce ingredients and whisk to fully combine. Add salt and pepper to taste.
-
Serve: Enjoy the grilled pittas with the yogurt sauce and any fresh veggies you like.

Pro Tips to Perfect Grilled Chickpea Veggie Pita
- Be Careful with the Heat: Maintain medium heat to prevent the veggies from burning. Adjust as needed during cooking.
- Taste as You Go: Always taste your mixture before finalizing to ensure the flavors are balanced.
- Use Fresh Ingredients: The fresher the vegetables, the better the flavor. Choose seasonal produce when possible.
- Warm the Pitas: Warm your pitas on the grill for a softer and more flavorful puff.
- Experiment with Spices: Don’t hesitate to add your favorite spices for an extra kick!
How to Serve Grilled Chickpea Veggie Pita
Grilled Chickpea Veggie Pita is delightful on its own, but you can enhance it further by serving it with:
- Fresh salad on the side, like a Greek or a simple mixed greens
- Sliced avocados or guacamole for added creaminess
- Pickled vegetables for a zesty crunch
- A drizzle of balsamic glaze for a sweet touch
Storing Your Grilled Chickpea Veggie Pita
-
Cool Completely: Make sure the grilled pitas cool completely before storing them.
-
Airtight Container: Place the pitas and filling in an airtight container to keep them fresh.
-
Refrigerate: Store in the refrigerator for up to 3 days.
-
Freeze for Longer: For longer storage, freeze the filling and separate pitas in freezer bags for up to 3 months.
-
Thaw Properly: When ready to eat, thaw overnight in the refrigerator before reheating.
-
Reheat Gently: Reheat on the grill or skillet over low heat to maintain texture.
Keys to Recipe Success
-
Use Good Quality Chickpeas: Opt for canned, organic chickpeas for the best flavor and texture.
-
Don’t Overstuff: Be thoughtful about how much filling you add to the pita to avoid tearing.
-
Get the Grill Hot: Preheat the grill to ensure that the pitas get nice, crisp grill marks.
-
Mind the Garlic: Fresh garlic adds great flavor, but be careful not to burn it, as it can become bitter.
Flavor Twist Ideas
- Add Heat: Mix in a pinch of red pepper flakes or sliced jalapeño for a spicy twist.
- Herbal Influence: Feel free to swap out parsley with fresh dill or basil for different herbal notes.
- Cheesy Delight: Add crumbled feta cheese in the filling or sprinkle it on top before serving.
- Fruitiness: Toss in diced tomatoes or some mango chunks for a sweet surprise burst of flavor.
- Crunch Factor: Add sunflower seeds or diced nuts for an extra crunch.
Grilled Chickpea Veggie Pita FAQ Guide
-
Can I use dried chickpeas instead?
Yes, make sure to soak and cook them before use. -
Can I make the filling in advance?
Absolutely! Prepare the filling a day ahead and store it in the fridge. -
Can I use a different type of pita?
Yes, any type of pita bread works, including gluten-free options. -
What can I substitute for za’atar?
If you don’t have za’atar, try oregano or a mix of thyme and sesame seeds.
Closing Remarks
Grilled Chickpea Veggie Pita is a versatile and nutritious meal that everyone will love. It combines protein, flavor, and a satisfying crunch, all wrapped up in a beautiful pita. Easy to prepare and delightful to eat, you can serve it for a casual lunch or dinner. Enjoy trying out different fillings and toppings, and make it your own! Happy cooking!

Grilled Chickpea Veggie Pita
Ingredients
For the Filling
- 2 tbsp avocado oil, divided
- 1 15 oz can chickpeas, rinsed and drained
- 1/2 large yellow onion, finely diced
- 1 large red bell pepper, finely diced
- 4 oz mushrooms, finely diced
- 5 cloves garlic, minced or crushed
- 1 tbsp tomato paste
- 1/2 tbsp soy sauce or coconut aminos
- 2 tsp za’atar
- 1/2 tsp ground cumin
- 1/2 tsp ground coriander
- 1/4 tsp fennel seeds
- 1/4 cup parsley, minced
- Salt and pepper to taste
- 3 whole grain pitas
For the Yogurt Sauce
- 1/2 cup plain, unsweetened vegan Greek-style yogurt or your favorite thick vegan yogurt
- 1/2 large lemon, juiced
- Salt and pepper to taste
- 1 clove garlic, crushed or finely grated
- 1/4 cup cilantro, finely minced
- 2 tsp extra virgin olive oil, optional
Instructions
Preparation
- Mash the Chickpeas: Place your chickpeas in a bowl and roughly mash them with a fork to crumble them, then set aside.
- Sauté the Vegetables: In a sauté pan over medium heat, heat up a tablespoon of oil. Add the onion, bell pepper, and mushrooms. Give the mixture a quick toss and let it sit for 2-3 minutes to release some of the moisture. Sprinkle in a pinch of salt and continue to sauté until the mixture has cooked down and most of the liquid has evaporated.
- Add Flavor: Add the garlic and sauté until fragrant. Then add the tomato paste, mashed chickpeas, soy sauce, za’atar, cumin, coriander, and fennel seeds. Sauté for an additional 2-3 minutes.
- Finish the Filling: Stir in the parsley, taste and adjust the seasoning to your liking, then set aside.
Cooking
- Prepare the Pitas: Preheat a griddle. Cut your pitas in half and open the pockets. Carefully stuff each pita half until it is filled to the top. Brush or spray the pitas with the remaining oil.
- Grill the Pitas: Place the pita filling side down on the grill for 3-4 minutes until grill marks appear. Flip and sear for about 3 minutes on the other sides. Repeat with the remaining pitas.
Yogurt Sauce
- Make the Yogurt Sauce: In a bowl, combine the yogurt sauce ingredients and whisk to fully combine. Add salt and pepper to taste.
Serving
- Serve: Enjoy the grilled pitas with the yogurt sauce and any fresh veggies you like.