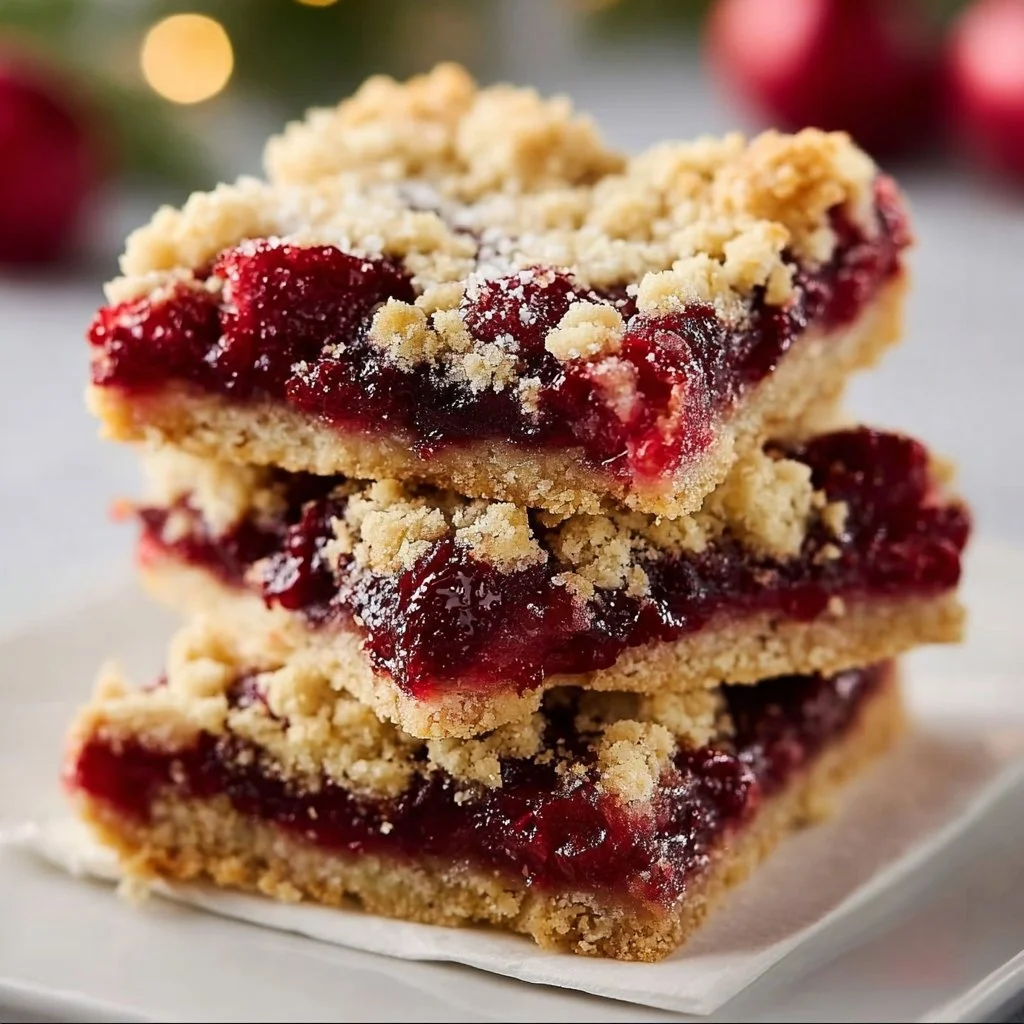
When the holiday season rolls around, nothing feels as comforting as Christmas Cherry Bars. With their rich buttery crust and sweet cherry filling, these bars are a delightful treat that brings joy to any gathering. Get ready to discover a simple recipe that will have your kitchen smelling heavenly and your family asking for more!
Ingredients List for Christmas Cherry Bars
- ½ cup (1 stick) unsalted butter, melted and cooled
- ½ cup granulated sugar
- 1½ cups all-purpose flour
- ½ teaspoon baking soda
- ½ teaspoon baking powder
- ¼ teaspoon salt
- 2 cups cherry pie filling (homemade or store-bought)
- Optional: powdered sugar or melted white chocolate for garnish
How To Make Christmas Cherry Bars Step-by-Step
Step 1: Preheat and Prepare
Preheat oven to 375°F (190°C). Line an 8×8-inch baking pan with parchment paper.
Step 2: Mix Butter and Sugar
In a large bowl, stir melted butter and sugar until smooth.
Step 3: Combine Dry Ingredients
Add flour, baking soda, baking powder, and salt. Mix until crumbly.
Step 4: Reserve Mixture for Topping
Reserve ¾ cup of the crumb mixture for topping.
Step 5: Form the Crust
Press remaining crumbs into the prepared pan to form the crust.
Step 6: Add the Cherry Filling
Spread cherry pie filling evenly over the crust.
Step 7: Add Topping
Sprinkle the reserved crumbs on top.
Step 8: Bake
Bake for 23–25 minutes, until golden brown.
Step 9: Cool and Cut
Cool completely before cutting into bars.
Step 10: Garnish
Dust with powdered sugar or drizzle with white chocolate if desired.

Time Breakdown
- Preparation Time: 15 minutes
- Baking Time: 23–25 minutes
- Cooling Time: 30 minutes
- Total Time: Approximately 1 hour
Chef’s Notes & Pro Tips About Christmas Cherry Bars
- Use good-quality cherry pie filling for the best flavor.
- For a more intense cherry flavor, consider using homemade pie filling.
- If you prefer a thicker bar, you can use a smaller baking pan and adjust the baking time accordingly.
- Try adding a splash of almond extract to the filling for a more complex flavor.
- These bars can be made ahead of time and stored for later enjoyment!
Reasons Why You’ll Love Christmas Cherry Bars
- They are easy to make and require minimal ingredients.
- Perfect for holiday gatherings and potlucks.
- The combination of buttery crust and cherry filling is a crowd-pleaser.
- They can be customized with different toppings or made with various fruit fillings.
Serving Suggestions for Christmas Cherry Bars
Serve Christmas Cherry Bars as a sweet treat at holiday parties or alongside a scoop of vanilla ice cream for dessert. Pair them with coffee or tea for a cozy afternoon snack, or drizzle with melted white chocolate for a festive touch!
Tips For Success
- Ensure the butter is melted and cooled before mixing to avoid cooking the sugar.
- Don’t overmix the crumb mixture; it should remain slightly crumbly.
- Line the baking pan with parchment paper for easy removal and cutting.
- Allow bars to cool completely for cleaner cuts.
- Store bars in an airtight container to maintain freshness.
Flavor Variations
- Berry Blast: Replace cherry filling with mixed berry filling for a tangy twist.
- Chocolate Cherry Bars: Mix in dark chocolate chips with the cherry filling for decadence.
- Coconut Cherry Bars: Add shredded coconut to the crust for a tropical flair.
- Nutty Crunch: Stir in chopped nuts (like almonds or pecans) into the crumb mixture for added texture.
How To Store Christmas Cherry Bars
- Airtight Container: Store bars at room temperature in an airtight container for up to 4-5 days.
- Refrigerator: For extended freshness, refrigerate bars for up to a week.
- Freezing: Wrap individual bars in plastic wrap and place in a freezer-safe bag for up to 3 months.
- Thawing: To enjoy frozen bars, thaw them at room temperature or in the refrigerator.
- Avoid Soggy Bottoms: Make sure they’re completely cooled before storing to prevent moisture accumulation.
FAQs About Christmas Cherry Bars
1. Can I use fresh cherries instead of pie filling?
Yes, you can use fresh cherries; just cook them down with some sugar and cornstarch to create a filling.
2. How can I tell when the cherry bars are done?
They should be golden brown on top and a toothpick inserted into the center should come out clean.
3. Can I make these bars gluten-free?
Absolutely! Use a gluten-free all-purpose flour blend in place of regular flour.
4. What can I do with leftover bars?
Enjoy them on their own, use them in a trifle, or crumble them over yogurt for a delicious treat!
Closing Notes
Christmas Cherry Bars are a delightful way to celebrate the holiday season with family and friends. They are easy to make and versatile enough to satisfy everyone’s taste. Whether you enjoy them as a festive dessert or as an everyday snack, these bars are sure to become a beloved favorite in your household. So, roll up your sleeves, gather your ingredients, and create a batch of these delicious bars that are bound to spread holiday cheer!

Christmas Cherry Bars
Ingredients
For the crust
- ½ cup unsalted butter, melted and cooled
- ½ cup granulated sugar
- 1½ cups all-purpose flour
- ½ teaspoon baking soda
- ½ teaspoon baking powder
- ¼ teaspoon salt
For the filling and garnish
- 2 cups cherry pie filling homemade or store-bought
- powdered sugar optional, for garnish
- melted white chocolate optional, for garnish
Instructions
Preparation
- Preheat oven to 375°F (190°C). Line an 8×8-inch baking pan with parchment paper.
- In a large bowl, stir melted butter and sugar until smooth.
- Add flour, baking soda, baking powder, and salt. Mix until crumbly.
- Reserve ¾ cup of the crumb mixture for topping.
- Press remaining crumbs into the prepared pan to form the crust.
- Spread cherry pie filling evenly over the crust.
- Sprinkle the reserved crumbs on top.
Baking
- Bake for 23–25 minutes, until golden brown.
- Cool completely before cutting into bars.
- Dust with powdered sugar or drizzle with white chocolate if desired.