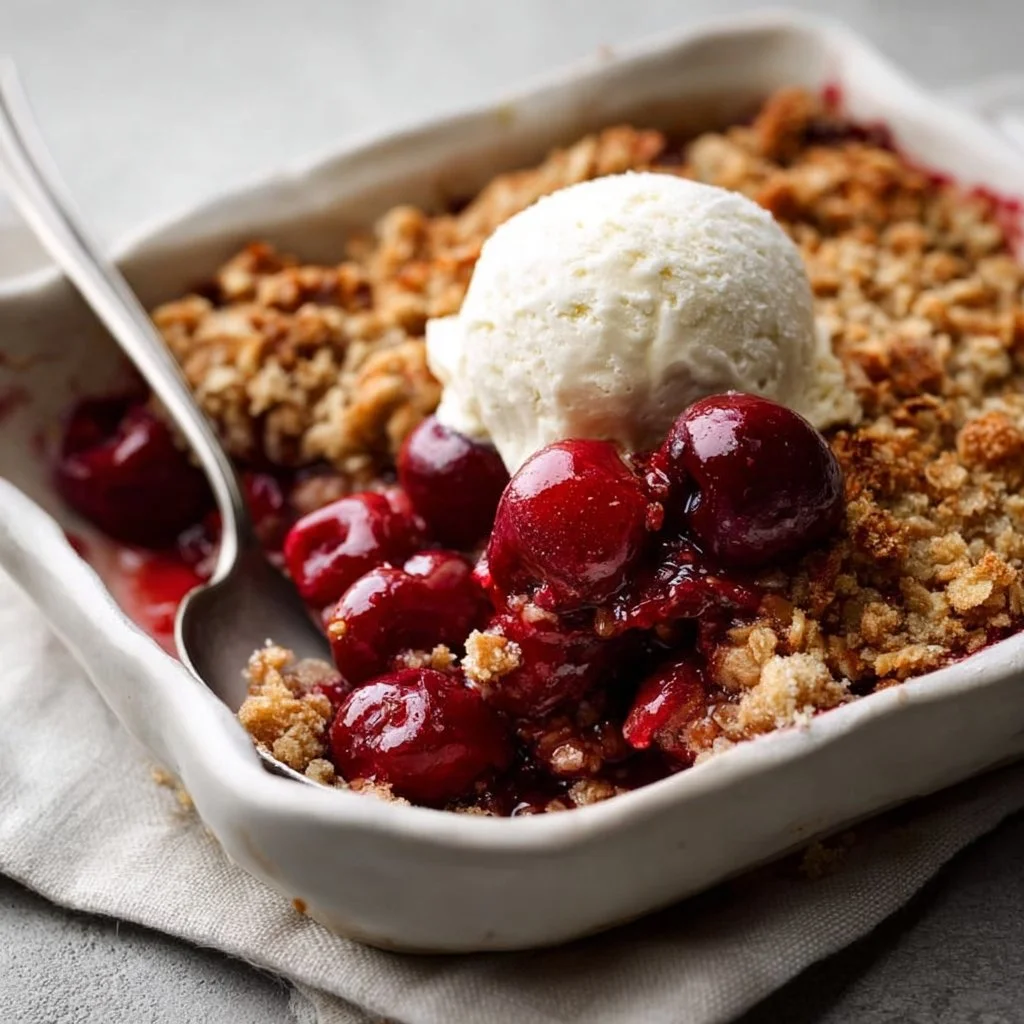
A warm kitchen filled with the scent of baked cherries and sweet buttery goodness is hard to resist. The Easy Cherry Crisp: 3 Ingredients for Pure Joy promises a delightful treat that’s quick to make and irresistibly tasty. Whether you’re a baking newbie or a seasoned pro, the simplicity of this recipe will have you creating dessert magic in no time. Read on to discover just how easy it is to bring this delicious dessert to your table!
Table of Contents
Table of Contents
Why You’ll Love Easy Cherry Crisp
- Simplicity: With only three ingredients, this recipe is perfect for any skill level. You hardly need to worry about complex techniques or hard-to-find ingredients.
- Quick and Easy: This cherry crisp can be prepared in no time, making it an excellent choice for last-minute dessert cravings or unexpected guests.
- Crowd-Pleaser: The sweet and tangy flavors of cherries, combined with the buttery crumble, are sure to delight everyone at the table.
- Versatile: While this recipe calls for cherry pie filling, it can easily be adapted with other fruits, allowing you to enjoy it year-round.
- Comfort Food: There’s something heartwarming about a crisp dessert. It’s perfect for cozy gatherings or to lift your spirits on a slow day.
Prep & Cook Time Breakdown
- Prep Time: 10 minutes
- Cook Time: 40-50 minutes
- Total Time: Approximately 50-60 minutes
What You Need For Easy Cherry Crisp
- 2 cans (21 ounces each) cherry pie filling
- 1 box (15.25 ounces) yellow cake mix
- 1 cup (2 sticks) unsalted butter, melted
Step-by-Step: How to Make Easy Cherry Crisp
Directions Made Simple
- Preheat Oven
- Preheat oven to 375°F (190°C).
- Prepare Cherry Filling
- Pour the cherry pie filling into a 9×13-inch baking dish. Spread evenly.
- Add Cake Mix
- Sprinkle the dry cake mix evenly over the cherry filling.
- Drizzle Butter
- Drizzle the melted butter over the cake mix.
- Bake
- Bake for 40-50 minutes, or until the topping is golden brown and the filling is bubbly.
- Cool
- Let cool slightly before serving.

Pro Tips to Perfect Easy Cherry Crisp
- Use Quality Ingredients: Choose high-quality cherry pie filling for the best flavor. Consider using organic or natural brands if available.
- Check for Bubbles: The filling should be bubbling around the edges when it’s done baking, ensuring that it’s heated through.
- Let it Rest: Allow the crisp to cool slightly before serving. This waiting time helps the filling thicken and makes it easier to scoop.
- Get Creative with Toppings: Serve with a scoop of vanilla ice cream or whipped cream to elevate your dessert experience.
- Experiment with Different Fruits: Try using peach, apple, or mixed berry pie filling for a delicious twist.
How to Serve Easy Cherry Crisp
Serve your Easy Cherry Crisp warm, ideally with a scoop of vanilla ice cream or a dollop of whipped cream on top. The contrast between the warm crisp and the cold ice cream is utterly delightful. You can also add a sprinkle of cinnamon or a few slivers of almonds for extra crunch and flavor!
Storing Your Easy Cherry Crisp
- Refrigerate: Store any leftovers in an airtight container in the refrigerator for up to 5 days.
- Reheat: To enjoy, simply reheat in the oven at 350°F (175°C) until warmed through, about 10-15 minutes.
- Freeze: If you want to store it for longer, freeze it before baking. Wrap well in plastic wrap and foil; it will last up to 3 months.
- Defrost: To use from the freezer, let it thaw in the refrigerator overnight before baking.
- Use Small Containers: You can portion out the crisp into individual containers for easy grab-and-go snacks.
Keys to Recipe Success
- Don’t Overmix: When adding cake mix, aim for even coverage without mixing it into the cherry filling.
- Choose Your Dish Wisely: A glass or ceramic baking dish is best for even cooking and to observe browning.
- Check for Doneness: Look for a nice golden crust on top and bubbling edges to know it’s ready.
- Adjust Cooking Time: Every oven is different, so keep an eye on your crisp to avoid burning.
Flavor Twist Ideas
- Nutty Delight: Add chopped nuts such as walnuts or pecans to the cake mix for added texture and flavor.
- Coconut Crunch: Sprinkle some shredded coconut over the top before baking for a tropical twist.
- Spiced Up: Mix in some cinnamon or nutmeg with the dry cake mix to add a warm spice flavor.
- Zesty Lemon: Add a tablespoon of lemon juice to the cherry filling for a refreshing zing.
- Chocolate Cherry: Mix in chocolate chips with the cherry filling for a decadent dessert.
Easy Cherry Crisp FAQ Guide
Q1: Can I use fresh cherries instead of pie filling?
A1: Yes, you can use fresh cherries, but you’ll need to add sugar, cornstarch, and a bit of lemon juice to mimic the pie filling’s consistency.
Q2: Is there a gluten-free option?
A2: Yes, you can use a gluten-free cake mix in place of the yellow cake mix for a gluten-free version.
Q3: Can I use margarine instead of butter?
A3: Although butter gives the best flavor, margarine can be used in a pinch.
Q4: How long does Easy Cherry Crisp last?
A4: It can be stored in the refrigerator for up to 5 days or in the freezer for 3 months.
Closing Remarks
The Easy Cherry Crisp is not just a dessert; it’s a delightful experience that brings comfort and joy to every bite. With minimal effort, you can whip up this treat to share with family and friends or indulge in by yourself. Perfect for any occasion, this recipe is bound to become a favorite in your household. Enjoy every delicious moment!

Easy Cherry Crisp
Ingredients
Main Ingredients
- 2 cans cherry pie filling 21 ounces each
- 1 box yellow cake mix 15.25 ounces
- 1 cup unsalted butter, melted 2 sticks
Instructions
Preparation
- Preheat oven to 375°F (190°C).
- Pour the cherry pie filling into a 9×13-inch baking dish and spread evenly.
Assembly
- Sprinkle the dry cake mix evenly over the cherry filling.
- Drizzle the melted butter over the cake mix.
Baking
- Bake for 40-50 minutes, or until the topping is golden brown and the filling is bubbly.
Serving
- Let cool slightly before serving.